So at long last she's [pretty much] done. It took a lot of time, and ~$500, but I'm quite proud of myself. It was a lot of fun to make, and it's been great seeing people play some nostalgic games while having a good stiff drink. If I were to do it all over again, there are definitely some things about it I'd change, but hey maybe someone will buy this one off me and I can make a better one someday. But probably not. Anyways, without further dudes here are some pictures of it!
Artwork is courtesy of Paul Loschak, which was my 21st birthday present from him, and it's amazing! And that Ms. Pacman sure is a babe!
Tuesday, November 13, 2007
Wednesday, October 31, 2007
Phase Four: Electronics
In case y'all didn't know, I'm a Mechanical Engineer, not an Electrical. Therefore my electrical knowledge is limited, and it took me two months to get around to wiring up the controls. But it's finally done, and here's the story:
I took apart a keyboard, and soldered short wires to the contacts on the tiny circuit board on a modern-day keyboard. Connecting these wires in various combinations creates the key signals we all know and love.
Here I attached longer wires to the two contacts on each switch [the groups of four switches being the four directions for each joystick].
Now I combine the long wires with the short wires such that I avoid awkward keys like the windows button and the function keys, while still making one of the joysticks correspond to the actual arrows, and making a button correspond to ENTER with another two as 'O' and 'K' since you have to type "ok" to make the emulator start, proving you aren't charging people money for downloaded games.
Look at me, it's almost like I know what I'm doing! Wow!
Chloe couldn't help but get in on the action, because electrical taping is one of her favorite pastimes.
Look at that sexy thing! Oh, and the control board is pretty cool too... [not quite all the buttons wired up, but fear not, they all are now]
The left side is gone because Paul is painting it, but it makes feeding wires through much easier! I now realize I have no decent picture of the controls themselves, I'll have to remedy that.
Looking through the absent left side. Starting from bottom: Spikes are from the casters I just added due to the fact that the thing is damn heavy. Black thing in bottom left is compressor from fridge. Silver tank is CO2, black box behind it is the woofer for the speaker system. Speaking of speakers, the knob in the top right is the volume control as well as aux in and out. The mess of wires you can see is clearly the mess of wires you've seen already. And the hoses carry the BEER! [At this moment, Yuengling]
Monday, August 20, 2007
Phase Three: Assembly
Well, it's almost done. We got really close to done with construction before we went to NYC for vacation, so we put it together. There's still no authentic controls, it just uses a keyboard and mouse, and we haven't put any doors on the side cupboards, but it's still looking cool!
Side view of the liquor shelves. Also we decided to leave the computer accessible for turning it on and off.
Front view! The speaker on the bottom is the subwoofer, while the speakers above are barely visible. Yes, I realize it's playing Windows Pinball. Oh well.
Chloe pinballin' it up!
Another shot. The other side has three shelves instead of the computer on the top.
The wooden-looking opening is temporary. I got too lazy, I'll make it eventually. For now it makes it easier to feed wires to the keyboard/mouse/volume thing.
Yep, more pictures.
I don't think these pictures show much anything extra, but I put 'em up here anyways.
Some pacman variant.
Again.
Here's the pacman we all know and love!
Yay pacman!
We really need some more realistic controls...
Tuesday, August 14, 2007
Phase Two: Make Arcade Machine
Well, Chloe and I worked all day yesterday and now we have something that roughly resembles an arcade machine! Here's roughly how it went down:
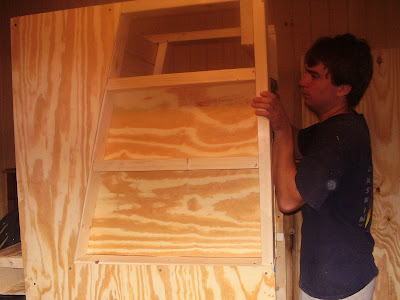
The frame looks kinda like an arcade machine.
Here we go. Note the large space underneath for the aforementioned kegerator.
I look retarded, but according to Chloe it proves that I actually made it.
Look at my awesome coordination. I rule!
Some nice shelves which may sometime in the near future hold some liquor or beer glasses.
I swear I'm not humping the arcaderator...
Back view. Bottom hole is for the woofer, top one for the monitor.
Chloe looking sexy as can be as she drinks and paints. She stuck around the whole time helping out, just so she could get to the painting!
I decided to paint the edges of the monitor because it would look weird not being black.
Here's me painting the monitor.
Front view all painted up.
An awkward side view of the shelves. It was hard to get far enough away to take good pictures. It'll be better once it's back in the living room.
Thursday, June 14, 2007
Phase One: Make Kegerator
Here's the fridge that we got for free from Sara. It's barely big enough though, so in order to theoretically fit a whole 1/2 keg I had to cut out the back corner that fit the compressor, in order to make room.
Here's the aforementioned compressor moved out of the way onto the plywood base.
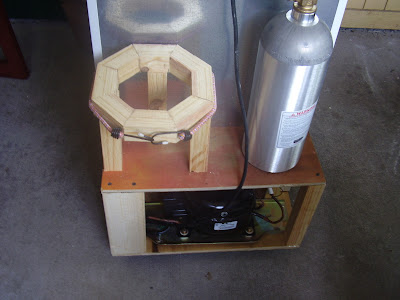
In order to hold the CO2 tank, Jim thought we should cut a circle in a piece of plywood, but since we didn't have a jigsaw, I decided to make an octagonical holder out of a 2x2.
Here the octagonical holder's coming together nicely.
Chloe being a sexy construction girl. :)
Here's all the kegerator parts I ordered online. Cool stuff.
Here's the back reasonably put together. Obviously the CO2 tank goes into the octagon though. And the bungee can come off the octagon once the liquid nails dries.
Here's a temporary tap I made for until we get to the arcade machine part. It felt like I was making a birdhouse!
Here's a keg all ready to be tapped!
And here's my first beer out of the brand spankin' new kegerator! Woo-hoo! 'Twas a success!
Chloe joined me for the first drinks, so that I wouldn't be an alcoholic drinking alone. And because she's awesome.
Finished backside with the CO2 junk.
Finished inside with my happy thermometer to keep an eye on the temperature.
Subscribe to:
Posts (Atom)